Write awesome documentation for your projects using sphinx.
Why this guide?
Documentation is one of those things every developer knows they should do… until the project grows, deadlines hit, and the README becomes a fossil from three months ago.
If you are reading this, you probably already understand the importance of documenting your code — not just for others, but also for your future self trying to remember why you wrote something at 2AM six months ago.
I’ve done this in the past for personal projects, and getting everything working can be somewhat complicated at first. This guide is a practical walkthrough for anyone wanting to set up clean, maintainable documentation for Python code using Sphinx.
I currently use this setup in my personal project, MARS, but the same approach works for virtually any Python repository.
Documentation is tragically forgotten in many projects, but when done properly, it becomes the holy grail for newcomers trying to understand and use your tools — assuming they have the patience to read it.
So, let’s build something sharp.
What is Sphinx and Why You Should Care
Setting up documentation manually is hardly a viable option.
The moment your API changes, your hand-written docs begin drifting away from reality. Maintaining everything by hand quickly becomes tedious and error-prone.
That’s where Sphinx comes in.
Sphinx is a documentation generator primarily designed for Python projects. It converts markup files — typically reStructuredText (.rst) or Markdown — into beautifully rendered HTML documentation. But it does much more than static pages.
With the right extensions, Sphinx can:
- Generate API documentation automatically from your source code.
- Convert Python docstrings into structured HTML pages.
- Create package/class/function references automatically.
- Build diagrams and inheritance graphs.
- Integrate with GitHub Actions and deployment workflows.
- Generate searchable documentation sites.
It has become one of the most standardized documentation systems in the Python ecosystem for a reason.
Interested?
Good. Let’s set it up.
Setting Up Sphinx
The setup process mainly consists of two parts:
- Installation
- Configuration
We’ll do everything locally first.
Installation
First, create a virtual environment if you haven’t already. If you are not sure how to create one, you can follow this guide.
python -m venv .venv
source .venv/bin/activate
Then install Sphinx:
pip install sphinx
Now initialize your documentation project:
sphinx-quickstart
This command prompts you with several setup questions and creates the initial documentation structure and configuration files.
A typical structure might look like this:
docs/
├── Makefile
├── build/
├── make.bat
├── source/
│   ├── _static/
│   ├── _templates/
│   ├── conf.py
│   └── index.rst
The important files here are:
conf.py→ your main configuration fileindex.rst→ your documentation entry point_static/→ custom CSS/images_templates/→ template overrides
So basically, everything under docs/source wil be the markup files that sphinx uses to generate a rendered output. This last one will be located inside docs/build
Understanding conf.py
The conf.py file is the heart of your Sphinx setup.
This file controls:
- Relevant project information -author(s), current version-.
- Extensions:
- Extensions are like plugins for the sphinx architecture. They are numerous and we will touch up on a few during this guide for some out-of-the-box functionality.
- Themes:
- Cosmetics for embellishing the documentation.
- Theme override through the use of custom css logic.
- Source paths:
- Where your source files are located to generate the desired output.
- Adding your package paths to ensure its contents are importable when looking through their API.
- What files should be excluded -if any- from the build.
- Build behavior:
- If you want to remove temporary files or keep them for debugging purposes.
- AutoAPI generation
- The format of the rendered objects from the API.
- Object/Elements filtering in case not everything is to be rendered.
- Creating index files for packages.
- Setting up inheritance diagrams for objects.
- Templates:
- Changing the default way to render an element type.
Here’s a practical configuration example taken from my personal project, MARS.
Whenever documentation build, this config file is going to be executed so its good to take advantage of it like:
- Sphinx must be able to import the python packages to document them. This means their import packages should be added in the
sys.path. - You can dynamically configure some elements like pulling from a changelog the current version of the package.
- Adding the date of the build.
Useful Extensions
Here’s what each extension actually does.
| Extension | Purpose |
|---|---|
sphinx.ext.duration | Shows build duration on the console |
sphinx.ext.napoleon | Supports Google-style docstrings |
sphinx.ext.autodoc | Generates docs from Python docstrings |
autoapi.extension | Automatically builds API references |
sphinx.ext.graphviz | Creates diagrams using Graphviz |
sphinx_copybutton | Adds copy buttons to code blocks |
sphinxcontrib.blockdiag | Diagram support |
sphinx.ext.inheritance_diagram | Visualizes class inheritance |
You can install additional extensions with pip install.
For example:
pip install sphinx-autoapi sphinx-copybutton furo
Just make sure to add them in the conf.py section:
extensions = [
    "sphinx.ext.duration",
    "sphinx.ext.napoleon",
    "sphinx.ext.autodoc",
    "autoapi.extension",
    "sphinx.ext.graphviz",
    "sphinx_copybutton",
    "sphinxcontrib.blockdiag",
    "sphinx.ext.inheritance_diagram",
]
Basic Build Commands
Upon finishing running the sphinx-quickstart command, this will create the makefile and make.bat files inside your /docs directory. This allows you to run the following commands -bear in mind that you need to run them from the docs dir- :
Clean previous builds:
make clean
Build HTML documentation:
make html
Generated files are usually located in:
docs/build/html
Open index.html in your browser to preview the site.
Organizing Your Documentation
For most projects, a simple structure works perfectly.
Something like this:
docs/
├── guides/
├── autoapi/
├── source/
└── build/
| Directory | Purpose |
|---|---|
guides/ | Manually written tutorials and walkthroughs |
autoapi/ | Auto-generated API documentation |
source/ | Main Sphinx source files |
build/ | Generated output |
This separation keeps your docs clean and scalable.
Source code documentation with AutoAPI
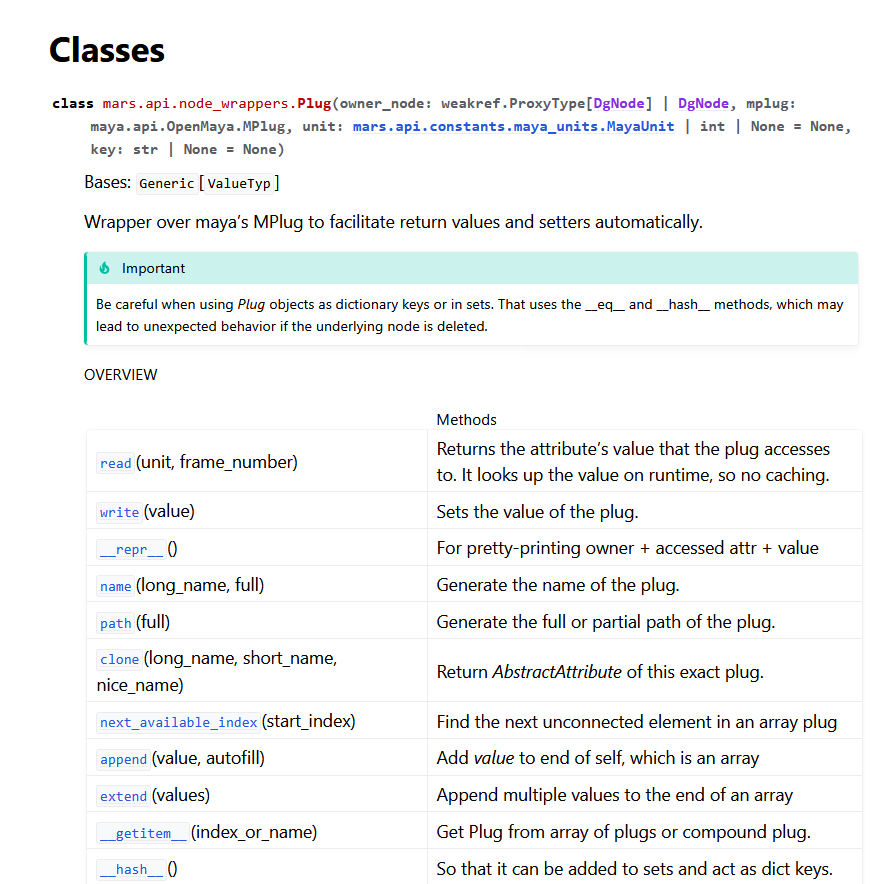
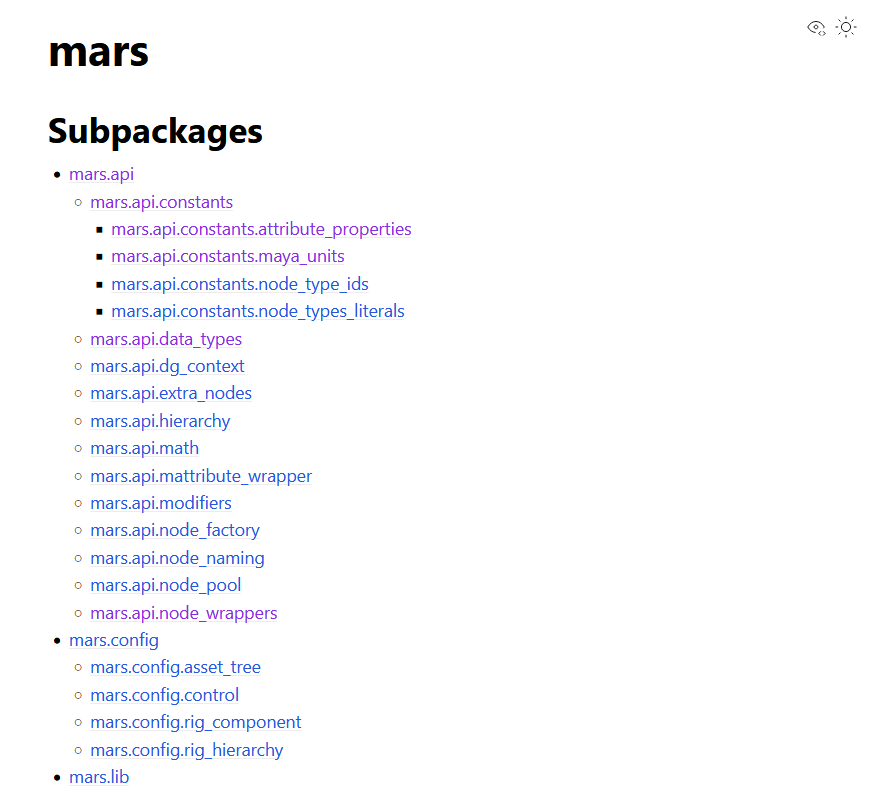
One of the best parts of Sphinx is automatic API generation. Instead of manually writing documentation pages for every class and function, AutoAPI scans your source code and generates everything automatically from your docstrings. This keeps your documentation synchronized with your actual codebase.
There are a few different methods to achieve this. My personal preference is the sphinx-autoapi extension because of its simplicity its excellent out-of-the-box results.
Make sure you have it installed on your virtual environmemt.
pip install sphinx-autoapi
And added to your extensions in conf.py.**
extensions = [
  ...
  "autoapi.extension",
  ...
]
Now when running make html, the autoapi package will traverse through your source code, generating the necessary markup files to be converted into .html, .pdf or other output format desired.
Writing Your First Guide Pages
We’ve seen how to use Sphinx to create documentation files out of your source code. However this doesn’t make great materials for writing user-firendly guides.
Proper docuimentation should include an explaination of how your tools & code should be used. For this we can create guides.
Guide pages are markup files, text files that use specific syntaxes to define how certain parts of them are to be displayed. For this, Sphinx traditionally uses reStructuredText (.rst), though Markdown (.md) support is possible through the usage of the sphinxcontrib-napoleon extension.
You can find cheatsheets for markdown and reStructuredText syntaxes.
A minimal page might look like this:
My First Guide
==============

Welcome to the documentation.

Section Title
-------------

Some text here.
You can then include the page inside your main index.rst.
Example:
.. toctree::
   :maxdepth: 2

   guides/installation
   guides/getting_started
Connecting Your Documentation Welcome Page
Your index.rst acts as the homepage of your documentation.
This file controls:
- Navigation
- Sidebar structure
- Table of contents
- Landing page content
Example:
Welcome to MARS Documentation
=============================

A modular pipeline toolkit for Maya.

.. toctree::
   :maxdepth: 2
   :caption: Guides

   guides/installation
   guides/workflows
This becomes the root navigation for your site. Make sure that paths are relative to your docs/source directory. This is why I recommend keeping them inside docs/source/guides.
Linking Elements with reStructuredText
One extremely useful feature is internal linking. This is done through anchors and references. Anchors are like a tag to a location on your documentation. References, on the other hand are like links to a specific anchor.
You can create anchors:
.. _installation-guide:
And reference them elsewhere:
See :ref:`installation-guide`
This becomes incredibly useful once your documentation grows.
Going Beyond
Once your documentation works, you can start making it look good.
Sphinx supports themes, templates, CSS overrides, and advanced rendering systems.
And honestly?
A good theme makes a massive difference.
Installing a Theme
One of the cleanest modern themes and a personal favorite of mine is Furo but I encourage you to check out sphinx’s theme gallery to find your personal preference.
Install it:
pip install furo
Then enable it in conf.py:
html_theme = "furo"
That alone dramatically improves the appearance of your documentation.
Customize the results of AutoAPI
The AutoAPI plugin has some neat configuration that allows us to tailor the results it produces. In this section we will cover some of its features but feel free to check out its own site.
You can define specifically which directories to traverse to pull source code for generating their documentation.
autoapi_dirs = [
    str(mars_module_path),
]
You can also set these variables to tailor your preferences:
# If not set to True, it will delete all .rst it generated upon finishing a build and only keep the built files
autoapi_keep_files = True

# Adds an index.rst for an "autoapi" package. If used, add it in your main <index.rst>'s toctree
autoapi_add_toctree_entry = False

# Specify the type of files it should document
autoapi_type = "python"


# Check the full list in (https://sphinx-autoapi.readthedocs.io/en/latest/reference/config.html#confval-autoapi_options)
autoapi_options = [
    "members",              # Display children of an object
    "undoc-members",        # Display objects that have no docstring
    "show-inheritance",     # Display a list of base classes below the class signature
    "special-members",      # Display special objects (eg. __foo__ in Python)
    "show-module-summary",  # Whether to include autosummary directives in generated module documentation
    "imported-members",     # Display objects imported from the same top level package or module.
]

# The name of the directory autoapi should output the necessary files for the build process
autoapi_output_dir = "autoapi"
Skipping Unwanted Members
Sometimes AutoAPI becomes too verbose.
You can filter unwanted attributes and undocumented members. To do so, you can use the function autoapi_skip_members to determine whether an object should be included in the recursive documentation of a package
or not. If the result of this function ends up being True, it will be skipped.
Then, make sure you connect the filter to sphinx’s setup.
Example:
def autoapi_skip_members(app, what, name, obj, skip, options):
    """Skip members based on their name or type."""

    # For skipping attributes of classes that don't have a docstring.
    if what == "attribute":
        if not obj.docstring or obj.docstring == "":
            return True

        return True

    return skip


def setup(sphinx):
    sphinx.connect("autoapi-skip-member", autoapi_skip_members)
This helps keep generated pages cleaner and easier to navigate.
Customizing AutoAPI Templates
AutoAPI also allows template overrides. These files consist in Jinja2 -a templating language- combined with reStructuredText -or another language like html- syntax.
In short, Jinja2’s purpose is to write reusable operations like blocks or loops and then define what text to write in those operations.
This means you can:
- Change page layouts
- Modify section ordering
- Add custom banners
- Improve readability
- Inject custom HTML
I define mine inside docs/source/api_templates. Like so:
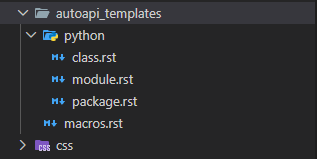
You can define a macro -a type of universal rule- for all of your pages and elements and then setup individual templates to customize the way python objects such as classes, modules, packages and functions are rendered. Just make sure they are separated in the same structure as in the image.
You will need to add the following inside your conf.py for sphinx to detect them.
autoapi_template_dir = "autoapi_templates" # Custom template directory for AutoAPI
Feel free to use a copy of the ones being used in MARS. You can find them here.
Mocking Modules to Prevent Build Errors
Sometimes your project depends on external applications or unavailable environments. For example, Maya Python APIs are unavailable outside Autodesk Maya. If your code imports any of these modules unavailable to Sphinx, the build will fail.
The solution? Mocking the imports.
You can remove the dependences to the maya modules very easily by adding this to your conf.py.
# Mock Maya-specific modules to prevent errors during documentation build

mock_modules_list = [
    "maya",
    "maya.cmds",
    "pymel",
    "pymel.core",
    "maya.api.OpenMaya",
    "maya.api.OpenMayaAnim",
    "maya.OpenMaya",
    "maya.OpenMayaAnim",
]

for mod in mock_modules_list:
    if mod in sys.modules:
        sys.modules[mod] = unittest.mock.Mock()
This technique is extremely useful for tools built around proprietary software APIs.
Final Thoughts
Sphinx can initially feel overwhelming.
There are many moving parts:
- Extensions
- Themes
- Builders
- Templates
- Auto-generated references
- Markup syntax
But once everything clicks together, it becomes one of the most powerful documentation systems you can add to a Python project.
And more importantly:
Good documentation changes how people experience your software.
A polished documentation site instantly makes a project feel:
- More professional
- Easier to adopt
- Easier to maintain
- More trustworthy
Most developers skip documentation because it feels tedious.
Ironically, proper tooling like Sphinx is exactly what makes documentation manageable in the first place.
So if you’ve been postponing it for your project, this is your sign to finally set it up.
Happy documenting!